
数据扩充是一种增加数据集多样性的技术,无需收集更多的真实数据,但仍然有助于提高模型的准确性和防止模型过度拟合。在这篇文章中,你将学习使用Python和OpenCV实现最流行和最有效的对象检测任务的数据扩充过程。
介绍的数据扩充方法包括:随机剪裁CutoutColorJitter添加噪声过滤首先,让我们导入几个库并准备一些必要的子例程。import os
import cv2
import numpy as np
import random
def file_lines_to_list(path):
'''
### Convert Lines in TXT File to List ###
path: path to file
'''
with open(path) as f:
content = f.readlines()
content = [(x.strip()).split() for x in content]
return content
def get_file_name(path):
'''
### Get Filename of Filepath ###
path: path to file
'''
basename = os.path.basename(path)
onlyname = os.path.splitext(basename)[0]
return onlyname
def write_anno_to_txt(boxes, filepath):
'''
### Write Annotation to TXT File ###
boxes: format [[obj x1 y1 x2 y2],...]
filepath: path/to/file.txt
'''
txt_file = open(filepath, "w")
for box in boxes:
print(box[0], int(box[1]), int(box[2]), int(box[3]), int(box[4]), file=txt_file)
txt_file.close()
下图在本文中用作示例图像。

随机剪裁随机剪裁:随机选择一个区域并将其裁剪出来,形成一个新的数据样本,被裁剪的区域应与原始图像具有相同的宽高比,以保持对象的形状。
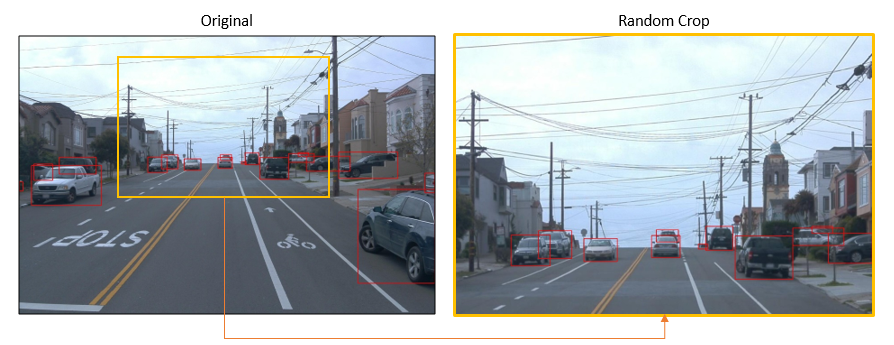
在上图中,左边的图像是带有真实边界框的原始图像(红色部分),右边的图像是通过裁剪橙色框中的区域创建的新样本。在新样本的标注中,去除所有与左侧图像中橙色框不重叠的对象,并将橙色框边界上的对象的坐标进行细化,使之与新样本相匹配。对原始图像进行随机裁剪的输出是新的裁剪后的图像及其注释。def randomcrop(img, gt_boxes, scale=0.5):
'''
### Random Crop ###
img: image
gt_boxes: format [[obj x1 y1 x2 y2],...]
scale: percentage of cropped area
'''
# Crop image
height, width = int(img.shape[0]*scale), int(img.shape[1]*scale)
x = random.randint(0, img.shape[1] - int(width))
y = random.randint(0, img.shape[0] - int(height))
cropped = img[y:y+height, x:x+width]
resized = cv2.resize(cropped, (img.shape[1], img.shape[0]))